How to 3D Model: A Step by Step Guide for Beginners
How to 3D model for beginners: choose software for your goal, build a first object step by step, check the mesh, and prepare it for 3D printing.

In this article
- Choose the program by your goal: Tinkercad or Onshape for printing, Blender for games, SketchUp for buildings.
- Build in 6 steps: reference and units, block out, refine the mesh, UV unwrap, texture and export.
- Check every model for holes, flipped normals, stray vertices and wrong scale before you use it.
- AI can draft a rough model, but a model that must match real dimensions is built and checked by a person.
To 3D model an object, you choose a program that fits your goal, collect reference, block out the shape from simple primitives, refine the mesh, then texture it or prepare it for printing and export it. Here are the 6 steps in order:
- Choose software for your goal. A part for 3D printing, a game prop and a building each start best in a different program.
- Gather reference and set units. Collect photos, drawings or measurements, and set the scene to real-world units before you add a shape.
- Block out the shape. Build the main proportions from simple primitives such as a cube or a cylinder.
- Refine the mesh and check it. Add edges only where the shape needs them, then check the mesh in wireframe.
- UV unwrap and texture, or prepare for printing. Flatten the surface so a texture fits, or make the mesh watertight for a printer.
- Export in the right format. The next tool in your pipeline decides the format.
3D modeling is the process of building a digital object from points, lines and surfaces in 3D space. The linked guide gives the plain definition and its uses. This guide covers choosing a program, building one object from start to finish, 3D printing, AI tools and where to get a model if you would rather not build it.
Choose 3D modeling software for your goal
Pick your first 3D modeling program by what the model is for. The table gives one good starting point per goal.
| Goal | Good first program | Modeling type | Usual export format |
|---|---|---|---|
| 3D printing parts and gadgets | Tinkercad for first steps, then Onshape or Fusion | Solid (parametric CAD) | STL or 3MF |
| Games and Roblox props | Blender | Polygon | FBX or OBJ |
| Characters and creatures | Blender sculpt mode or ZBrush | Sculpting, then retopology | FBX |
| Architecture and interiors | SketchUp, Revit or ArchiCAD | Polygon or BIM | FBX or IFC |
| Product and industrial design | Fusion or Rhino | NURBS or solid | STEP |
| On a tablet | Nomad Sculpt or Shapr3D | Sculpt or CAD | OBJ or STEP |
Free options exist for most rows, but check each vendor’s current license terms before you use a program for paid work. Switching programs later is normal, because the concepts in this guide carry over from one program to the next. For buildings, see how 3D architectural modeling from drawings works.
How to 3D model: step by step with a first project
A coffee mug is a good first object. It uses most of the core operations and works in any polygon program. The steps below name the operations, because the key presses differ by program. For the Blender key presses, see our 3D modeling in Blender guide. These are the operations, each in a few words:
- Extrude. Pull a face outward or inward to add or remove volume.
- Inset. Shrink a face inward to create a smaller face inside it.
- Bevel. Round or cut a sharp edge.
- Loop cut. Add a ring of new edges around the model.
- Bridge. Connect two openings with new faces.
- Mirror. Model one half and let the program copy it to the other side.
- Subdivision surface. Smooth the mesh by splitting each face into smaller faces.
- Choose software. Use the table above. For a mug that will be rendered or printed, any program in the table works. Name every object in the scene (for example “mug_body”) from the start, and save numbered versions (mug_v01, mug_v02) so you can go back.
- Gather reference and set units. Photograph a real mug from the side and from above. Measure its height, width and wall thickness with a ruler. Set the scene units to millimeters or centimeters before you add any shape, and place the photos in the viewport as background images.
- Block out the shape. Add a cylinder primitive with a low number of sides and scale it to the measured height and width. Do not add detail yet. The blockout is only for proportions.
- Refine the mesh. Select the top face, inset it to set the wall thickness, then extrude it down to hollow the mug. Bevel the rim so it is rounded. Add loop cuts close to the top and bottom edges, then add subdivision surface. These extra loops are called support edge loops: they keep the corners crisp when the mesh is smoothed. For the handle, select 2 faces on the side, one near the top and one near the bottom. Extrude each one outward a short distance, then bridge the 2 end faces. Add loop cuts to the handle and move them to curve it. Then run the 5 checks in the section below.
- UV unwrap and texture. A seam is a cut line where the 3D surface opens flat. Put the seam down the back of the mug and under the handle, then unwrap. Apply one material with a color and a roughness value. See UV unwrapping and texture mapping for the map types.
- Export. Choose the format from the table above or from the file formats section below. A game asset often needs LOD versions: copies with fewer faces that are shown at a distance. A product or architectural model is exported at full detail for rendering.
Modeling basics: the building blocks and principles
Every polygon model, in every modeling program, is made from the same small set of parts.
- Vertex. A single point in 3D space. It is the smallest unit of a model.
- Edge. A straight line that connects two vertices.
- Face. A flat surface bounded by edges. Three edges make a triangular face, four make a quad, five or more make an n-gon.
- Mesh. A collection of vertices, edges and faces connected together. A model can be made of one mesh or several.
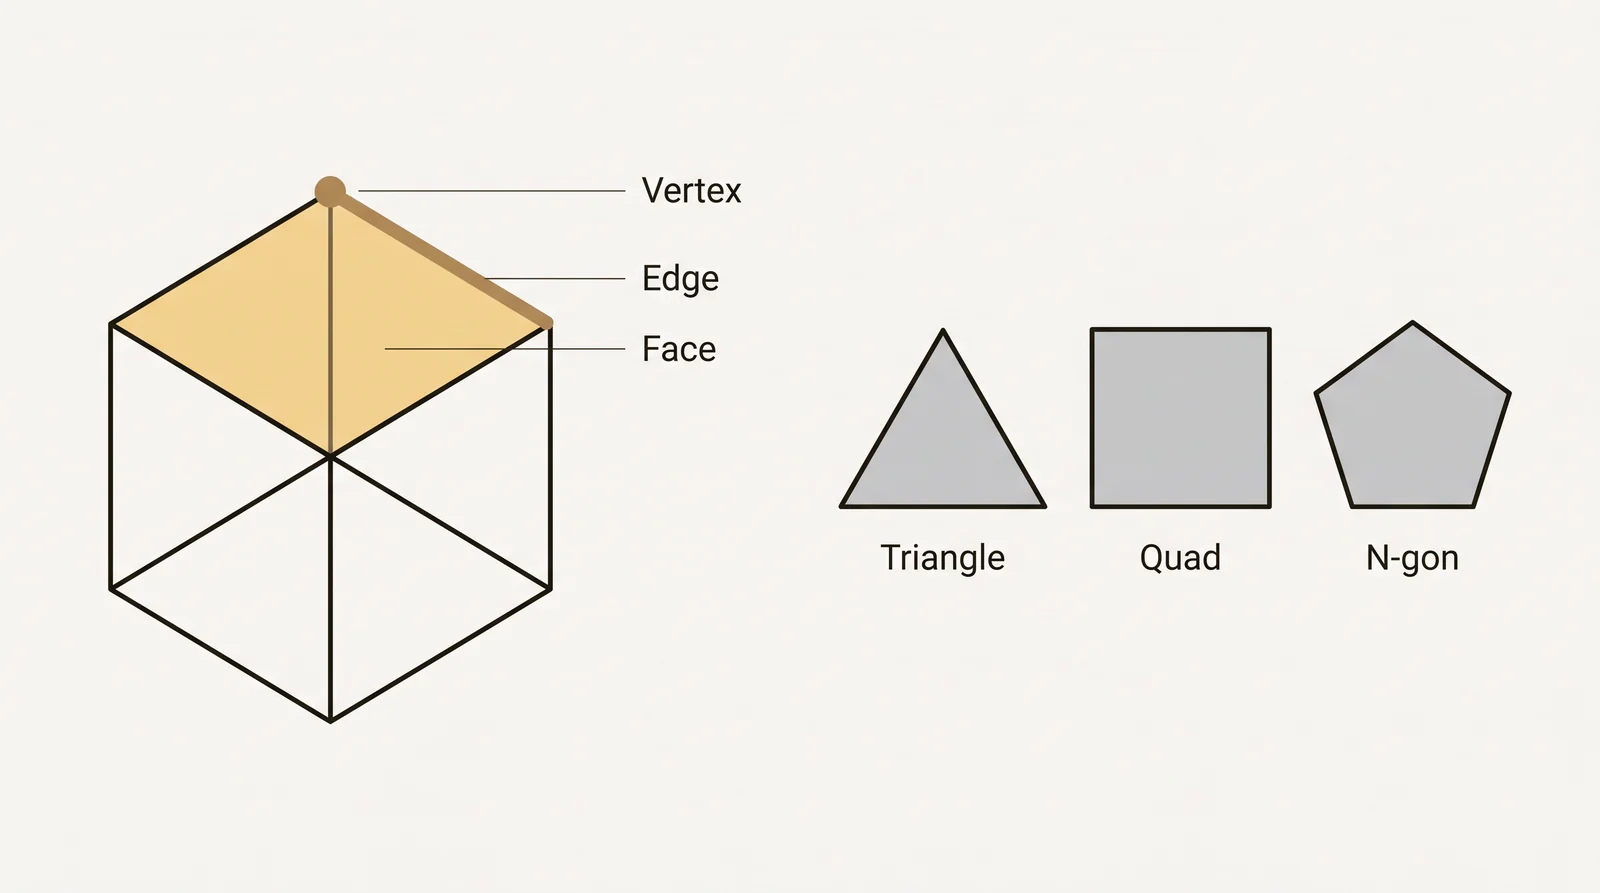
The polygon mesh guide explains how each vertex, edge and face is organized. A model with fewer faces is a low poly model: lighter to move around the viewport and quicker to render, but less detailed. A high poly model holds far more detail but is slower to edit and heavier to render.
Three habits apply in every program. Keep as few points as the shape needs. Route edges so they follow where a surface bends or a hard edge sits. Add detail only where the camera or a close up view will see it.
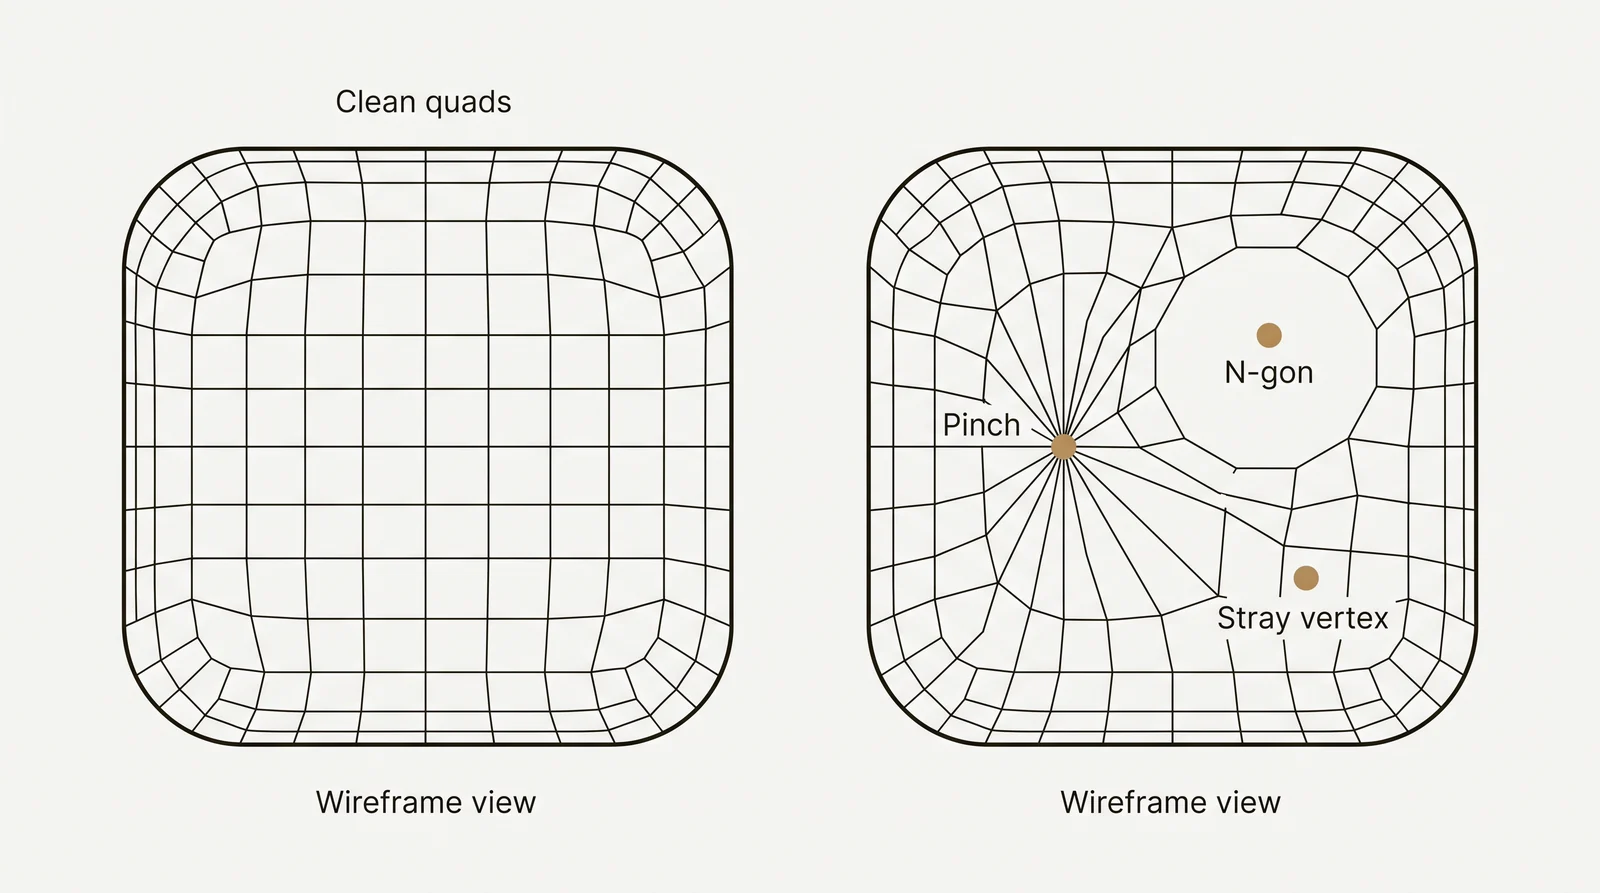
Most modeling programs let you switch the viewport to a wireframe view, which shows only the edges of the mesh and hides the shaded surface. Checking a model in wireframe shows topology problems that the shaded view hides: edges that pinch together, faces that are not needed, or areas where the mesh is denser than the shape requires.
How to check a 3D model
Run these 5 checks before you call a model done:
- Look at the wireframe. Find poles (points where 3 edges, or 5 or more edges, meet) and triangles in curved areas. They can pinch the surface when it is smoothed.
- Look for n-gons. On a surface that will bend or be smoothed with subdivision, split n-gons into quads.
- Merge duplicate vertices. Select everything and use the merge by distance function (some programs call it weld). It removes vertices that sit on top of each other.
- Recalculate normals. A normal tells the program which side of a face is the outside. Dark or inverted faces usually mean the normals point inward.
- Check the scale. Measure one known dimension in the program and compare it with the real object.
3D modeling or modelling: is there a difference
No. They are the same word. The form with a single l is the American spelling, and the form with a double l is the British spelling. This site uses the American spelling.
Modeling techniques and when to use each
Games, product design and CAD engineering each favor a different technique, often more than one on the same project. For definitions of each, see the types of 3D modeling.
Polygon modeling
Polygon modeling builds a shape from connected vertices, edges and faces. Beginners usually use box modeling: start from a cube, then extrude, cut and move parts until the shape appears. It is the most common method for game assets, characters, props and buildings, because the result is a light, flexible mesh.
NURBS modeling
NURBS stands for non-uniform rational basis spline. A NURBS surface is defined by curves, so it is perfectly smooth instead of built from small flat faces. That makes NURBS common in product design, automotive surfaces and CAD, where a curved panel must be exact. An untrimmed NURBS surface always has 4 sides. Holes and other outlines are made by trimming the surface, and joining many trimmed surfaces cleanly takes care.
A NURBS surface has its own built-in UV coordinates, so it can be textured in programs such as Rhino or Maya. Most renderers and all common game engines turn NURBS surfaces into polygon meshes before drawing them, so for games a NURBS model is converted to a mesh first.
Digital sculpting
Digital sculpting works like clay: you push, pinch and smooth a dense mesh, from the broad shape down to fine surface detail. It suits characters, creatures and skin folds. A sculpt is usually too dense for a game or an animation, so the next step is retopology: building a new, clean, lower poly mesh over the sculpt. Manufactured objects with straight edges and flat panels are called hard surface models, and they are usually built with polygon or CAD tools instead.
Solid modeling
Solid modeling describes the object as a closed volume. Most mechanical CAD programs build solids parametrically: a 2D sketch is extruded, revolved or cut, and every step is recorded so a dimension can be changed later and the whole part updates. Solid models are used when a part must be manufactured, so its size and volume must be exact.
Procedural modeling
Procedural modeling generates a shape from a set of rules and parameters instead of manual point by point work. You set up the rules once, then change the parameters to produce variations. It is used for terrain, foliage, city blocks and other cases where modeling every instance by hand would take too long.
| Technique | Best for | Can be textured directly |
|---|---|---|
| Polygon modeling | Games, characters, most everyday assets | Yes |
| NURBS modeling | Product and automotive surfaces, CAD | Yes, in CAD and rendering programs; convert to a mesh for game engines |
| Digital sculpting | Organic shapes, characters, creatures | Yes, after retopology and UV unwrapping |
| Solid modeling | Mechanical CAD parts | Not usually the goal |
| Procedural modeling | Terrain, foliage, repeated patterns | Varies by tool |
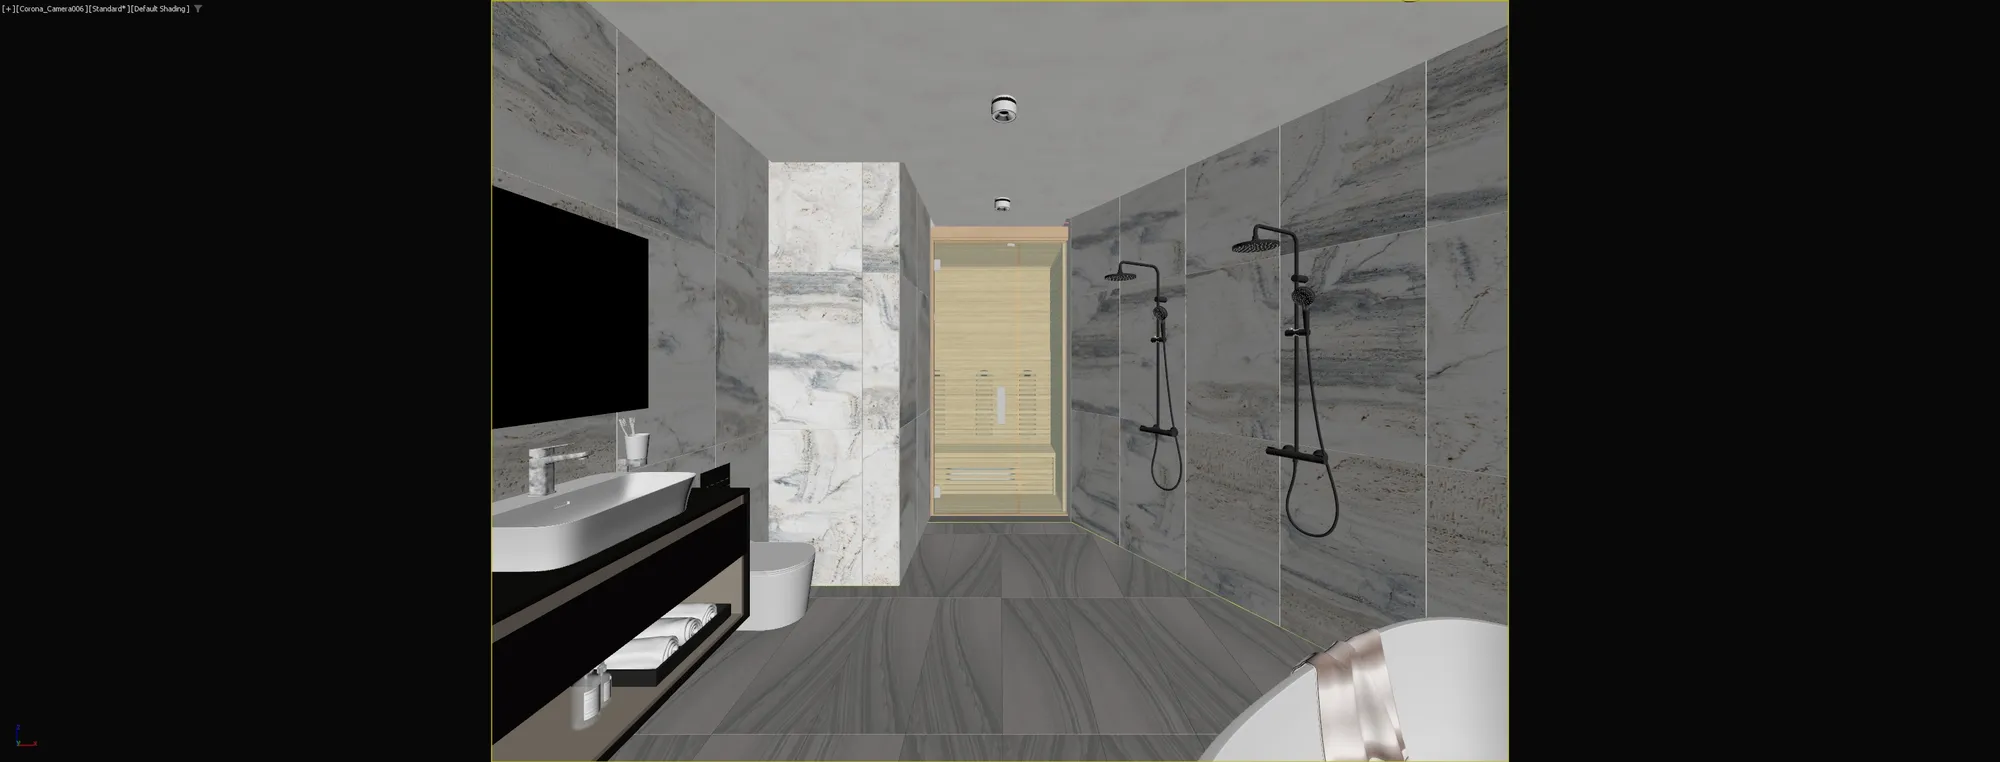

Left is the 3D viewport model of a bathroom before final lighting and rendering, and right is the finished render of the same room: modeling builds the shapes, then materials and lighting turn them into the final image.
How to 3D model for 3D printing
A model for 3D printing must be a closed, watertight solid in real-world units. A solid CAD program is the easiest start, because it builds closed volumes. Check these points before you export:
- Watertight mesh. No holes and no open edges. The mesh must be manifold, which means every edge joins exactly 2 faces.
- Normals face outward. Inverted faces can make the slicer treat part of the outside as the inside.
- Millimeters. STL stores no units, so model in millimeters and check the size in the slicer.
- Wall thickness. Walls must be thick enough for your nozzle size and material. Check the printer maker’s guidance for your machine.
- Overhangs. Steep overhangs need supports or a different orientation. The slicer preview shows where supports will be added.
- Print bed size. Split large objects into parts that fit the bed, with flat faces where the parts join.
- Format. Slicers read STL, OBJ and 3MF. 3MF is the safer choice because it keeps units and color. The slicer then makes the file the printer runs (usually G-code).
To convert a file to or from STL, use the free STL converter.
Common 3D model file formats
Choose the file format by what happens next: a game engine, a slicer or another CAD program.
- STEP. Describes product and mechanical part data without depending on one modeling program, so it moves cleanly between CAD programs.
- STL. The standard format for 3D printing. It stores only the surface of the model: no color, no texture and no units, so the slicer cannot tell whether the numbers mean millimeters or inches.
- 3MF. A newer format for 3D printing that keeps units, color and print settings.
- OBJ. Stores the mesh, UV coordinates and normals. Materials sit in a separate .mtl file that points to the texture images, so send the .obj, the .mtl and the images together.
- FBX. Carries geometry, materials and animation together, which is why it is common in games and film.
- glTF. A compact format for real-time and web viewing, also used for game assets.
If a file is in the wrong format, you can convert a 3D model to another format online.
Can AI or ChatGPT make a 3D model
Yes, AI can produce a rough 3D model, but not a finished model that is checked against real measurements. Chat assistants such as ChatGPT can write code that builds simple geometric shapes, for example an OpenSCAD script or a Blender Python script. You run the script in the program to get the model. Image-to-3D and text-to-3D tools generate a mesh from a picture or a prompt.
The output usually needs cleanup: dense or messy topology, no real scale and poor UVs. AI tools do not hold exact geometry: on a building, window counts, balconies and rooflines drift between views. Nothing in the output is checked against drawings. Use AI for early concepts and placeholders. Build the model by hand, or have it built from the drawings and checked by a person, when the dimensions must be right.
Where to get 3D models without modeling them
There are 3 routes.
Download from a model library. Sketchfab, Printables, Thingiverse, TurboSquid and CGTrader list models from many makers. Check the license before commercial use, and check the scale and topology after you download.
Scan a real object. A 3D scanner, or photogrammetry (software that turns many overlapping photos into a mesh), captures an object that already exists. A scan needs cleanup before it is useful.
Have a modeler build it. Send drawings, photos or CAD files to a modeler or studio. 3Dstudio.co builds 3D models from files such as CAD (.dwg) drawings, PDF plans, SketchUp, Revit and ArchiCAD files. See our 3D modeling service for details.
Common 3D modeling mistakes and how to practice
Common beginner mistakes:
- Adding subdivision for extra detail before the base shape and proportions are correct, which locks in errors that are hard to fix later.
- Ignoring topology. Stray vertices and uneven edge flow cause shading errors and make texturing and animation harder.
- Modeling a whole object as one continuous piece instead of separate parts that can be checked and fixed on their own.
- Skipping reference images and guessing dimensions instead of measuring them or checking them against a drawing.
- Working in default units, then finding the model is the wrong size in the slicer or the game engine.
What to practice, and how long it takes to learn
Learning the interface is quick. Topology and proportion take sustained practice. This ladder adds one new skill at each step:
- A die or a table from one primitive: scale, extrude and bevel.
- A mug: holes, handles and subdivision.
- A chair: repeated parts and symmetry with mirror.
- A small room: scale and many objects that fit together.
- A character or a vehicle: curved forms and clean edge flow.
Having a 3D model built for you
If you would rather not model it yourself, send 3Dstudio.co the files: CAD (.dwg) drawings, PDF plans and elevations, SketchUp, Revit, ArchiCAD or 3ds Max files, or common 3D and BIM formats. A photo of a hand sketch is enough for a quote. Add material specs if you have them. We send one fixed quote within 30 minutes of receiving the files. Open-ended 3D modeling work is billed at €85 per hour, and how the quote is calculated is on the pricing page.
For game studios, assets are delivered with clean topology, real-world scale and non-overlapping UVs, with authored LODs, built to your triangle budget and naming convention, as FBX or glTF. See the game studios page for how that works. The same list is a useful checklist for your own models.
Questions about how to 3D model
How do I start 3D modeling as a complete beginner?
Pick one program that matches your goal: Tinkercad or Onshape for printable parts, Blender for games and art, SketchUp for buildings. Model one simple real object from reference. Learn move, extrude, inset, bevel and loop cut first, and move to a harder object only when the first one has clean topology.
Can ChatGPT make a 3D model?
Not as a finished, checked model. ChatGPT can write a script, for example in OpenSCAD or Blender Python, that builds simple geometric shapes, and separate image-to-3D tools generate rough meshes. Expect to fix topology, scale and UVs by hand, and to check every dimension against a drawing.
How do I 3D model something for a 3D printer?
Model in millimeters, keep the mesh watertight with outward-facing normals, and keep walls thick enough for your printer. Plan supports for steep overhangs. Export STL or 3MF, and check the file in the slicer before printing. 3MF is the safer choice because it keeps units and color.
Where can I get a 3D model without making it myself?
Download one from a model library and check the license before commercial use, scan the real object, or have a modeler build it from drawings or photos. Downloaded models and scans often need cleanup, and neither is guaranteed to match real measurements.
Can I 3D model on a phone or tablet?
Yes, on a tablet with a stylus. Sculpting apps such as Nomad Sculpt and CAD apps such as Shapr3D run on iPad. A phone screen is workable for viewing and light edits, but not for detailed modeling.
Which 3D modeling technique should a beginner start with?
Polygon modeling is the usual starting point. It uses a small set of tools, and the results work in almost any other program or engine. Choose solid CAD instead if your first goal is a part for 3D printing.
Is 3D modeling hard to learn?
The basic tools in any modeling program can be learned quickly. Topology, proportion and knowing how much detail a model needs take longer. They come from practicing on simple objects before moving to complex ones.