Texture Maps in 3D (Textured Maps): Every Map Type and How PBR Uses Them
Texture maps control the color, bumps, shine and metal look of a 3D model. Here is every common map type, the 2 PBR workflows, and how to make your own.
In this article
- Texture maps control color, bumps, shine, metal look and transparency on a 3D model.
- The cheat-sheet table lists each map with its values, color space and slot in Blender and Unreal Engine.
- PBR has 2 workflows, metal/roughness and specular/glossiness, and a specular map belongs to the second.
- Most texture problems come from color space, normal map convention or UV layout, and the problem table shows each fix.
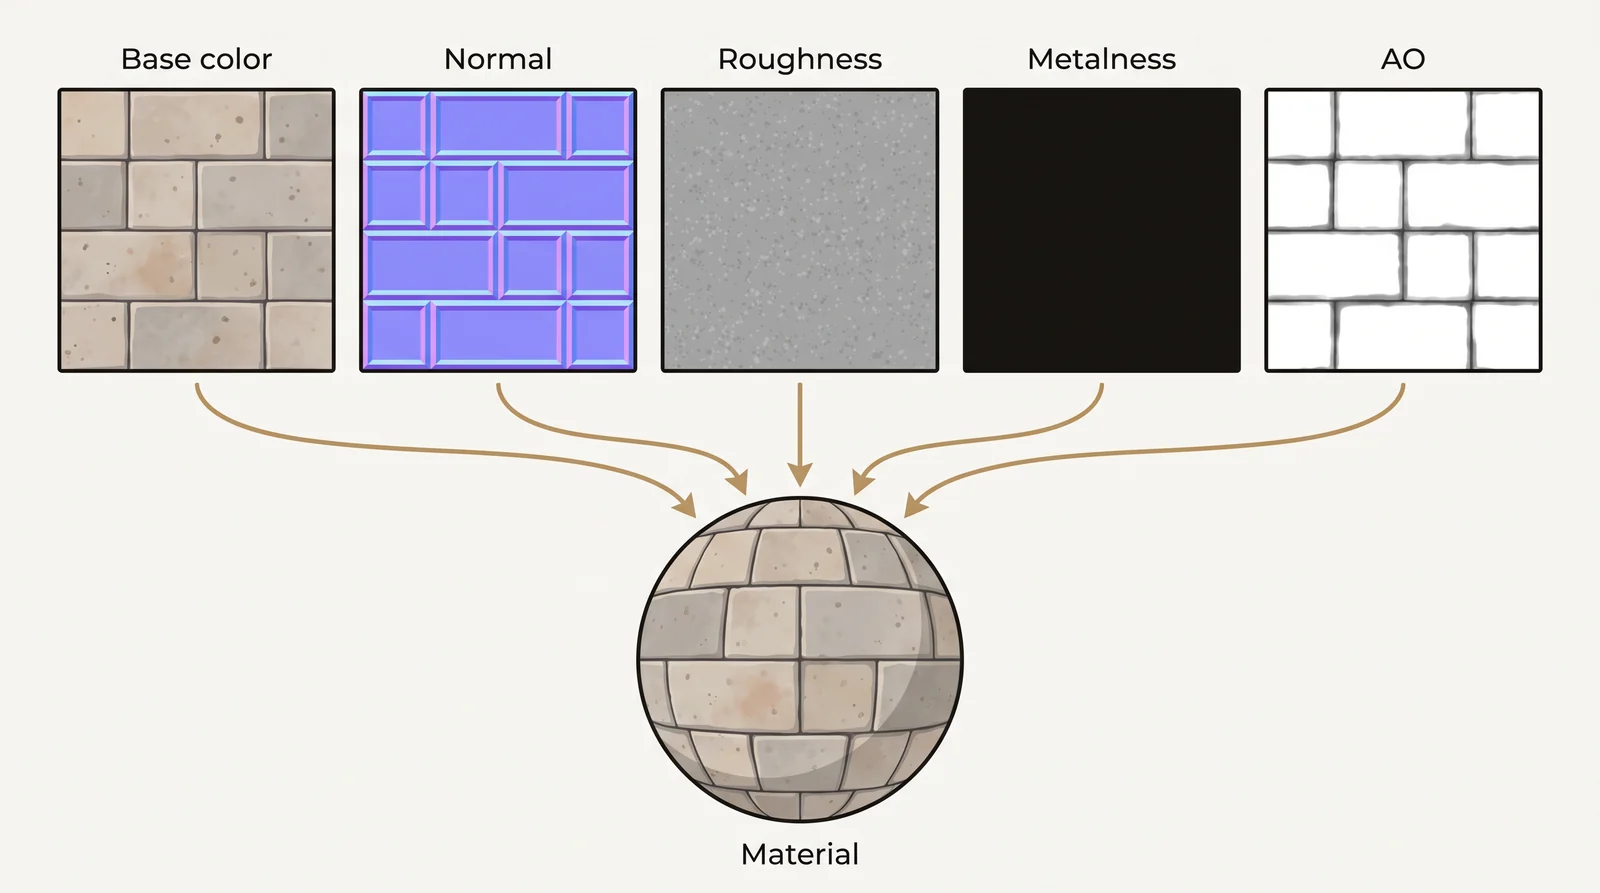
Texture maps, also called textured maps or material maps, are the 3D material images that tell a 3D renderer or game engine what a surface looks like: its color, bumps, shine, metal look and transparency. The main types are base color (albedo), normal, roughness, metalness, height (displacement), ambient occlusion, opacity, emissive and specular. Without texture maps, the model renders in one plain gray material.
Most materials combine several of these maps, one map per property. Texture mapping also has its own types: the projection methods that place the image on the mesh, which are UV, planar, box (triplanar), cylindrical and spherical mapping.
3Dstudio.co builds and textures 3D models for game studios and product teams, with one fixed quote within 30 minutes of receiving the files.
What is 3D texture mapping
3D texture mapping is the process of wrapping one or more 2D images onto the surface of an object built with 3D modeling. UV coordinates say which part of the image lands on which part of the mesh. Once a model has a UV map, the renderer can look up color, roughness and other properties for every point on the surface. Edwin Catmull introduced the technique in his 1974 doctoral thesis at the University of Utah.
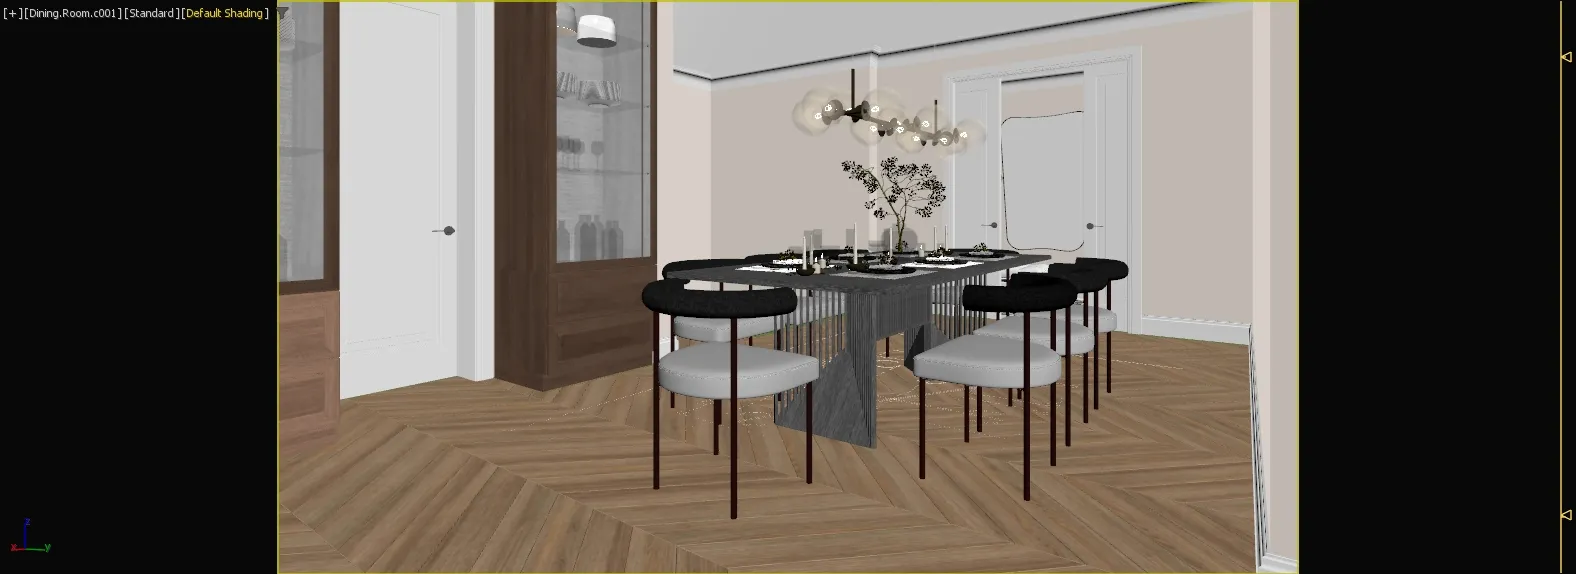
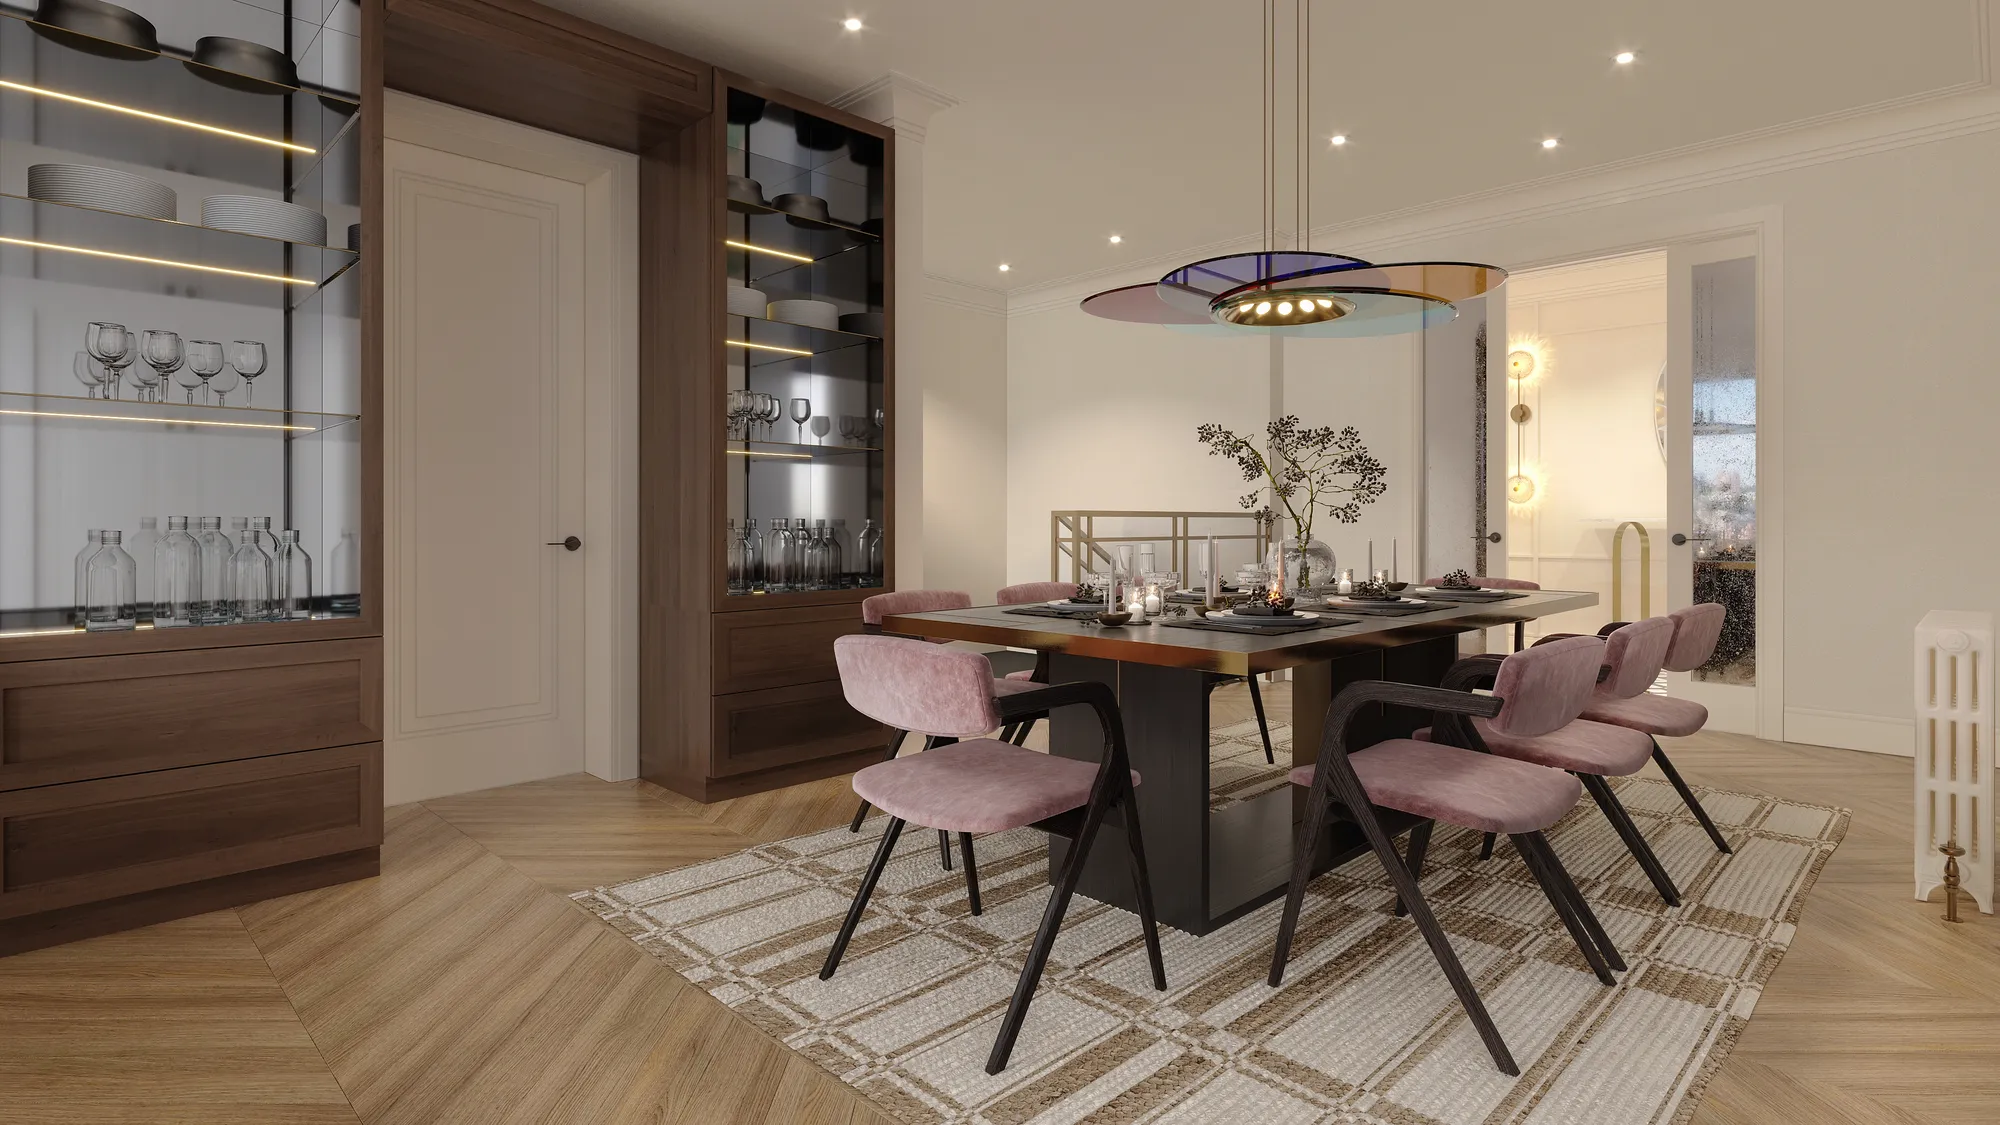
Left is the clay model of a dining room, right is the finished render, and the difference between them is what texture maps add: wood grain on the herringbone floor, fabric on the chairs and paint on the walls.
Texture, material and shader are easy to mix up. A texture is one image. A material is the set of maps plus its settings, such as color tint and strength. A shader is the program that turns the material and the light into the pixels you see.
Texture mapping also cuts down how much geometry a model needs. A brick wall can be a flat plane with a normal map instead of thousands of individual bricks modeled as geometry, so the scene renders faster and the file stays smaller.
Types of texture mapping
Texture mapping types describe how an image is projected onto a mesh. The map types in the next section describe what each image stores.
| Method | How it works | Best for | Where it fails |
|---|---|---|---|
| UV mapping | The mesh is unwrapped to a flat layout, and every point gets 2D coordinates | Characters, props and hero assets, where you want full control | Needs unwrapping work. Seams and stretching appear if the layout is poor |
| Planar | The image is projected straight along one direction | Flat walls, floors and decals | Stretches on surfaces that run parallel to the projection direction |
| Box or triplanar | The image is projected from 3 axes and blended where they meet | Rocks, terrain and architecture without UVs | Blend zones can look soft, and it costs more to compute than planar |
| Cylindrical | The image wraps around an axis | Bottles, columns and pipes | The flat end caps stretch |
| Spherical | The image wraps outward from a center point | Balls and planets | The image pinches at the poles |
| Procedural | A formula generates the pattern, so no image is needed | Marble, wood grain, noise and large variation | Hard to match a specific real material |
Two terms come up as soon as you use UV mapping. Texel density is how many texture pixels cover each unit of surface, and it should be even across a model. UDIMs split one model across several texture tiles for more detail. The UV unwrapping guide covers both in depth.
Types of texture maps
Most materials use several maps. Each map controls one property. The table lists each map, its values, its color space and the slot it plugs into in Blender’s Principled BSDF and in Unreal Engine.
| Map | What it controls | Values | Color space | Blender slot | Unreal slot |
|---|---|---|---|---|---|
| Base color (albedo) | Surface color with no lighting painted in | Full color | sRGB | Base Color | Base Color |
| Diffuse | Surface color in the specular/glossiness workflow or older shaders | Full color. Raw metal is black in specular/glossiness | sRGB | Base Color | Base Color |
| Normal | Fine bumps and dents, made with lighting | RGB direction data | Linear | Normal, through a Normal Map node | Normal |
| Bump | Fine bumps, made with shading only | Black is low, white is high | Linear | Normal, through a Bump node | Usually converted to a normal map |
| Roughness | How sharp or blurry reflections look | Black is glossy, white is matte | Linear | Roughness | Roughness |
| Glossiness | The inverse of roughness | Black is matte, white is glossy | Linear | Roughness, after inverting | Roughness, after inverting |
| Metalness | Which areas are bare metal | Black is non-metal, white is metal | Linear | Metallic | Metallic |
| Specular | Reflectance color and strength in the specular/glossiness workflow | Full color | sRGB | No direct slot. Specular Tint (color) and Specular IOR Level (strength) are the nearest inputs | Specular, strength only |
| Height (displacement) | Surface relief | Black is low, white is high | Linear | Displacement node | Parallax or displacement setup, depending on version |
| Ambient occlusion (AO) | Soft shadow in creases and corners | Black is fully shaded, white is open | Linear | No AO input | Ambient Occlusion |
| Opacity (alpha) | Cut-outs such as leaves and fences | Black is cut away, white is solid | Linear | Alpha | Opacity Mask or Opacity |
| Emissive | Which pixels give off light | Black is no light, color is the glow | sRGB | Emission Color | Emissive Color |
| Transmission | See-through materials such as glass | Usually a single value, not an image | Linear | Transmission Weight | Translucent material setup |
Base color and albedo
A base color map, also called an albedo map, stores only the surface color. It has no shadow, shine or reflection baked in, so the same map keeps working under any lighting the scene uses later. In the metal/roughness workflow, the base color of a metal surface is also its reflection color.
Normal maps
A normal map stores a direction for every pixel, using red, green and blue as the 3 axes. The directions tell the renderer which way each tiny patch of surface is facing, so light and shadow fall as if there really were bumps and dents there. The base mesh underneath stays as low poly as before. A flat area shows as light blue-violet.
Tip: a normal map fakes depth with lighting only. It does not change the model’s silhouette, so keep large shape changes in the mesh and leave fine detail, like pores, stitching or scratches, to the normal map.
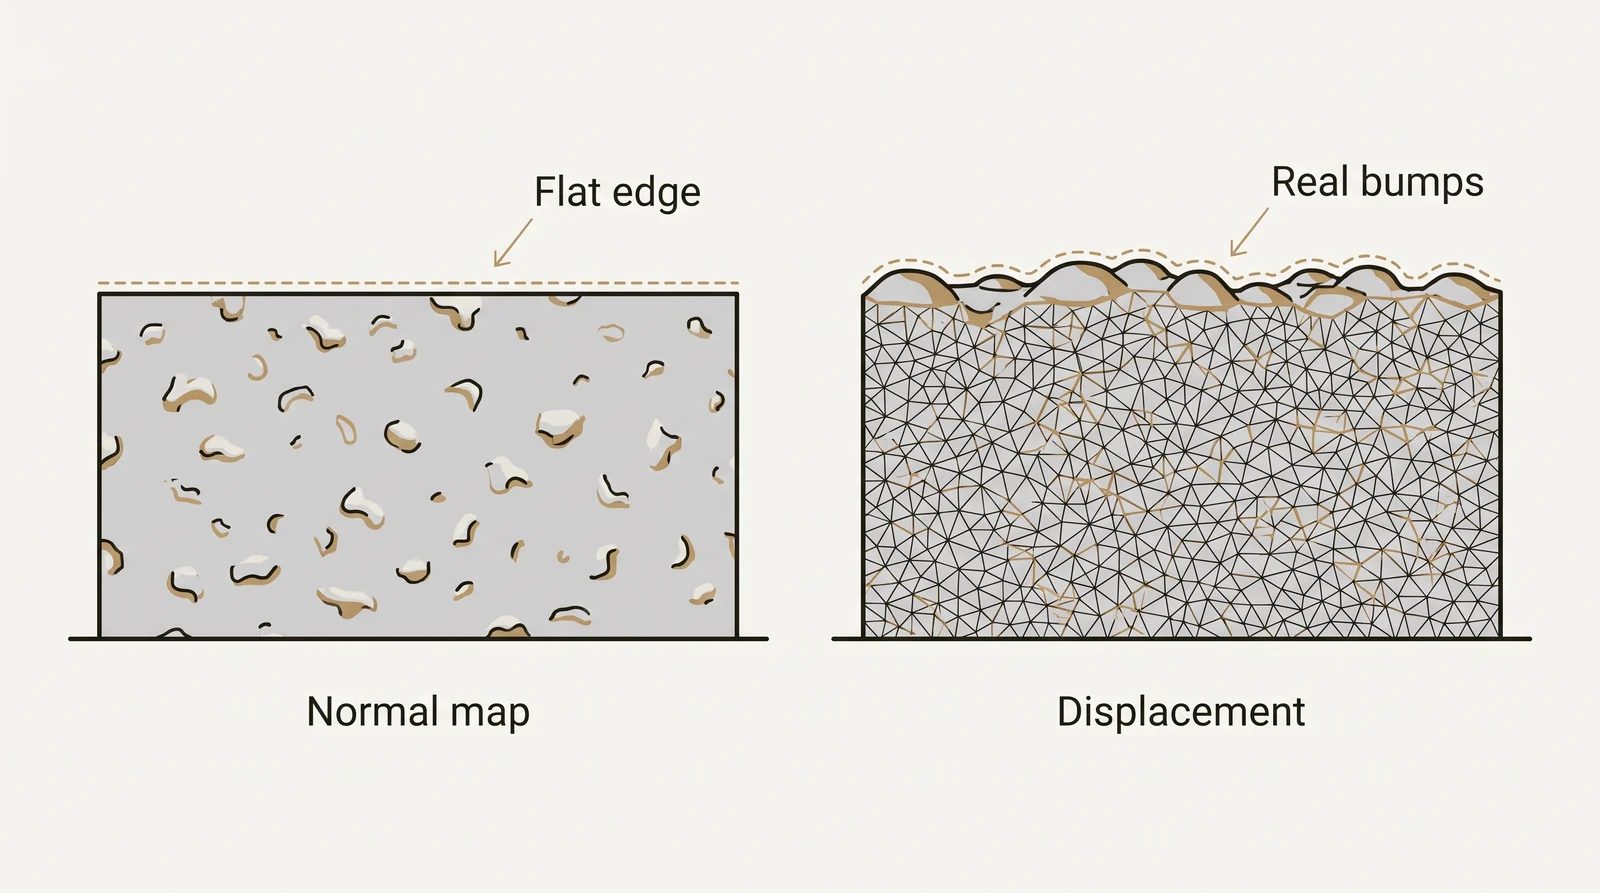
A bump map is the simpler relative. It is a grayscale height image that only shifts shading as if the surface were higher or lower. A normal map stores a full direction per pixel, so it handles angled detail better. Neither changes the silhouette. Only displacement does.
Normal maps come in 2 conventions. In the OpenGL convention, a bright green value means the surface faces up. The DirectX convention reverses the green channel. Blender, Unity and Maya expect OpenGL. Unreal Engine and 3ds Max expect DirectX. If bumps look like dents, flip the green channel or export the map again in the other format. You can make a normal map from any photo with our free normal map generator, which exports both conventions.
Roughness and glossiness maps
A roughness map sets how sharp or blurry reflections look. A dark value gives a mirror-like polish, and a light value scatters light into a soft matte finish. A glossiness map is the same idea inverted: dark is matte and light is glossy. Some tools use one and some use the other, so check which one your target expects.
Metalness maps
A metalness map is a mask that marks which parts of the surface are bare metal. The values are mostly pure black or pure white. Gray appears only where metal is partly covered, for example by dirt, dust or rust. A renderer combines the mask with the base color and roughness maps to decide how each pixel reflects light.
Specular map
A specular map stores the reflectance color and strength of a surface in the specular/glossiness workflow. For non-metals it holds the base reflectivity (called F0). For metals it holds the reflection color. In older non-PBR shaders, the specular map was a painted map of highlight strength.
The specular map only exists in one of the 2 PBR workflows. The table compares them.
| Workflow | Maps used | Where you see it |
|---|---|---|
| Metal/roughness | Base color, metalness, roughness | Unreal Engine, Blender’s Principled BSDF and glTF |
| Specular/glossiness | Diffuse, specular, glossiness | Older asset libraries and some engines and renderers |
Height and displacement maps
A height map stores relative height for every pixel: dark is low and light is high. What it does depends on how you use it. As displacement, it moves the surface, but only if the mesh has enough polygons. As a bump or parallax effect, it only changes shading, so the silhouette stays flat. Real displacement costs a denser mesh and a heavier scene.
Ambient occlusion maps
An ambient occlusion (AO) map stores soft shadow in creases, corners and contact points, which receive less ambient light. Real-time engines use it to darken ambient light, and Unreal Engine has an Ambient Occlusion input for it. Offline renderers such as Cycles, V-Ray and Corona calculate this shadow themselves, so the AO map is usually left out there. Blender’s Principled BSDF has no AO input, and multiplying an AO map into the base color darkens the creases twice.
Opacity and alpha maps
An opacity map, also called an alpha map, cuts parts of a surface away. Use it for leaves, fences, lace and fabric mesh. Glass is different. It uses the material’s transmission setting and an index of refraction, not an opacity map.
Emissive maps
An emissive map marks which pixels give off light, for example screens, LEDs, lit windows on a building at night or fire. Black means no emission. In a path tracer such as Cycles, an emissive surface also lights nearby surfaces. In a real-time engine it usually only glows, unless the engine’s global illumination uses emissive surfaces as light sources.
PBR texture maps
PBR maps are the texture maps of a PBR (physically based rendering) material. PBR describes a material by its physical properties, so it reacts to light in a consistent way under any lighting setup. Game engines such as Unreal Engine and Unity, renderers such as Cycles, V-Ray and Corona, and texturing tools such as Substance 3D Painter all work with PBR materials. The tool that makes the maps and the tool that renders them must use the same workflow, or the maps must be converted first.
PBR has 2 workflows, metal/roughness and specular/glossiness, compared in the specular map section above. Both are PBR, so a material that uses a specular map is not automatically a non-PBR material.
Older non-PBR shaders are a different system. They use a diffuse map that often has lighting baked in, a painted specular strength map, and a bump map. Bump maps are also still used inside PBR renderers for fine detail.
Channel packing
Game pipelines often pack 3 grayscale maps into the red, green and blue channels of one image to save memory. A common layout is ambient occlusion in red, roughness in green and metalness in blue, called an ORM map. The glTF format stores roughness in the green channel and metalness in the blue channel of one texture. A packed image holds data, so it must be read as linear (Non-Color), not sRGB.
Albedo vs diffuse maps
Albedo and diffuse maps look almost identical, and they differ in 3 ways.
- Baked shadow. An albedo map holds flat, pure color, because the PBR lighting model calculates all the shading itself. An older diffuse map can carry baked shadow and light from its source photo. That shadow is wrong under any other light.
- Metal. In the metal/roughness workflow, the albedo (base color) of a metal holds its reflection color. In the specular/glossiness workflow, the diffuse map of raw metal is black, because the color lives in the specular map.
- Workflow. Albedo belongs to metal/roughness. Diffuse belongs to specular/glossiness and to older shaders.
Color space, bit depth and file formats
Color maps and data maps need different color space settings. Base color, diffuse, specular and emissive maps are color images, stored as sRGB. Normal, roughness, glossiness, metalness, height, AO and opacity maps are data, stored as linear. In Blender, set the image’s color space to Non-Color for every data map. In Unreal Engine, untick sRGB on the texture.
The result of a wrong setting is easy to see. A roughness map read as sRGB makes the surface look glossier than intended, because its mid grays are read as darker values. A normal map read as sRGB gives wrong lighting.
For formats, use PNG or TGA at 8-bit for color maps and most masks. Use 16-bit PNG or EXR for height and displacement maps, because 8-bit images often cannot hold all the detail and show visible steps. Blender’s manual notes that 16 or 32-bit float maps give better results than 8-bit for baked bump maps. Use EXR for HDR data and baked float data. Game engines compress textures to their own formats on import.
How texture maps are made and applied
From a high detail sculpt
Building a full set of texture maps for a game asset usually follows the same order:
- UV unwrap the model so every point on the mesh has a matching 2D position, using UV mapping software.
- Create the base color: paint it by hand, build it from photos, or generate it in a texturing application.
- Bake the normal, height and ambient occlusion maps from a high detail model, often made with digital sculpting, down onto the low poly mesh that will actually be used.
- Set roughness and metalness, or specular and glossiness, to match the real material: metal, wood, fabric, skin or glass.
- Load the finished maps into the renderer or game engine and check them under more than one lighting setup before moving on.
Texture resolution is chosen for where the model will be seen. A background prop might only need a small texture. A hero product shot or a close up character usually calls for 4K, and a single hero asset for print or a cinematic might go up to 8K per map. Lower level of detail (LOD) models can use smaller maps.
How to make a texture map from a photo
- Photograph the surface straight on, in soft, even light. Avoid flash highlights and strong shadows.
- Crop to one clean area and make it tileable, so the edges blend and the pattern can repeat.
- Drop the photo into the free normal map generator. It can make a normal map, height map, roughness map and AO map from a photo in your browser, and the image is not uploaded. Pick OpenGL or DirectX to match your software.
- Adjust the strength on the lit preview. If joints or cracks look raised instead of sunken, invert the height.
- Download the maps and test them on a sphere or a flat plane under 2 different lighting setups.
The roughness and AO maps from a photo are estimates made from its brightness. Check them against the real material. Other routes are painting maps in a texturing application, building a procedural material, or baking from a high poly sculpt as above.
Where to find texture maps
Poly Haven and ambientCG offer free texture sets under the CC0 license, which allows commercial use. Textures.com and Adobe Substance 3D Assets offer large commercial libraries. Check the license of any map before you use it in a commercial project.
What goes wrong and how to check
| Problem | Likely cause | Fix |
|---|---|---|
| Visible seams | UV islands have no padding, or the texture is not tileable | Add padding around UV islands, or make the texture tileable |
| Stretched texture | Uneven texel density | Apply a checker pattern to find the stretched areas, then rescale the UV islands |
| Bumps look inverted | Wrong normal map convention | Flip the green channel, or export in the convention of the target software |
| Surface too shiny or too flat | Roughness read as sRGB, or glossiness used as roughness without inverting | Set data maps to linear (Non-Color), and invert glossiness |
| Dark blotchy creases | AO multiplied into base color in a renderer that already calculates occlusion | Remove the AO map from base color in path tracers |
| Obvious repeating pattern | The tile is too small and repeats too often | Scale the tile up, add variation, or add a second detail map |
| Blurry close up | The resolution is too low for the camera distance | Use a higher resolution map, or more UV space for that part |
How to texture 3D models for games and product renders
Real-time and offline work use maps differently.
| Topic | Real-time (games) | Offline (product and architectural renders) |
|---|---|---|
| Map set | Metal/roughness set, often packed as ORM | Tileable materials at higher resolution |
| Budget | Strict texture and polygon budget, with resolution matched to each LOD | Set by render time, not by a frame budget |
| Detail | Baked normal and AO maps on a low poly mesh | Real displacement where it is visible |
| Ambient occlusion | AO map is used | The renderer calculates it |
Character skin and clothing add more maps, as in texturing a 3D character. A product model is textured for a single well lit hero shot or a rotating turntable, so the maps can run at a higher resolution and the mesh can carry more detail. In architectural visualization, tileable materials cover walls, floors and cladding.
Getting models textured by a studio
To get a model textured, send these items with the quote request.
- The 3D model, or the drawings it should be built from.
- Reference photos of each material.
- The target engine or renderer.
- The normal map convention, OpenGL or DirectX.
- The map set, resolution, channel packing and triangle budget you expect.
For game assets, 3Dstudio.co delivers PBR texture sets at the resolution and in the channel packing you ask for, with the meshes as FBX or glTF or as an Unreal or Unity package. The game studio page lists everything that comes back. For hero objects, see 3D product rendering. For the model itself, see our 3D modeling and texturing service.
Questions about texture maps
What is a specular map?
A specular map stores the reflectance color and strength of a surface in the specular/glossiness PBR workflow. It holds F0 for non-metals and the reflection color for metals. Metal/roughness workflows replace it with a metalness map.
What is the difference between a bump map and a normal map?
A bump map is a grayscale height image that shifts shading in or out. A normal map stores a direction per pixel in RGB, so it handles angled detail better. Neither changes the silhouette. Displacement does.
What is the difference between metal/roughness and specular/glossiness?
Both are PBR workflows. Metal/roughness uses base color, metalness and roughness. Specular/glossiness uses diffuse, specular color and glossiness, which is roughness inverted. Unreal Engine and glTF use metal/roughness.
How do I make a texture map from a photo?
Photograph the surface straight on in soft light and make it tileable. Then generate the normal, height, roughness and AO maps with the free normal map generator. Test them under 2 lighting setups.
Why does my normal map look inverted?
The green channel convention does not match your software. OpenGL and DirectX normal maps are opposite in green. Flip the green channel, or export the map in the convention of the target software.
Which texture maps should be set to Non-Color?
All data maps: normal, roughness, glossiness, metalness, height, AO and opacity. Only base color, diffuse, specular and emissive stay sRGB.
What resolution should a texture map be?
It depends on how close the camera gets. Background objects can use a small map. A hero product shot or a close up character usually needs 4K, and a single hero asset for print or a cinematic might go up to 8K.