What Is UV Unwrapping? UV Maps, Seams and Tools Explained
UV unwrapping flattens a 3D mesh into a 2D UV map. This guide covers the steps, seams, UV islands, texel density, UDIMs, how to check an unwrap and the tools used.
In this article
- What UV stands for and what a UV map does
- How to unwrap a model step by step and how to check the result
- How seams, UV islands, texel density and UDIMs work
- Which software to use, and what to specify when a studio unwraps a model for you
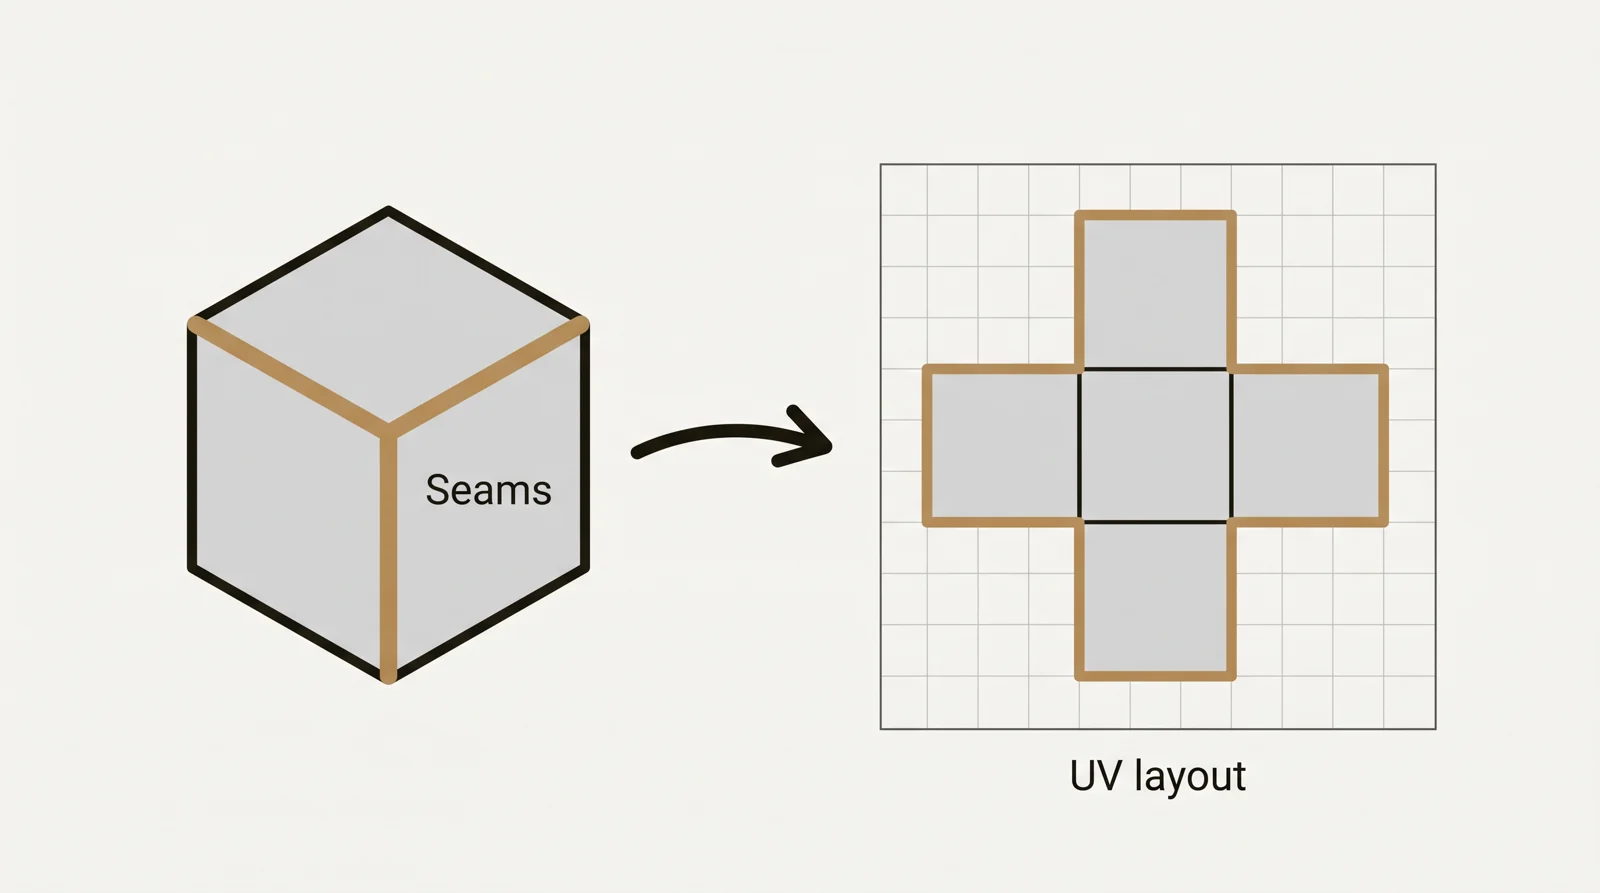
UV unwrapping is the process of cutting a 3D mesh along seams and flattening it into a 2D UV map, so a flat texture image lines up on every face of the model.
UV stands for the two axes of that flat map: U is horizontal and V is vertical. X, Y and Z already name position in 3D space, so the texture coordinates use their own letters. In 3D modeling, unwrapping comes after the mesh is finished and before texturing. A studio that builds models to order, such as our 3D modeling service, does it as part of the model. For most models, Blender’s built in UV Editor is free and enough. RizomUV and UVLayout are dedicated tools that are faster for many assets or complex characters.
What UV stands for in 3D
U is the horizontal position on a texture image and V is the vertical position. Both run from 0 to 1 across the image, no matter how many pixels the image has.
A UV map is a flat 2D layout of a 3D model’s surface. Each corner of each face on the model gets a UV coordinate, and that coordinate points to a spot on the 2D texture image. UVs are stored per face corner, not per vertex. Where 2 faces meet along a seam, the same 3D vertex has 2 different UV positions, one in each flattened piece. This is why seams exist, and why a seam can show in a texture.
The UV layout follows the same faces and edges as the polygon mesh: each face in 3D has a matching face in the UV map.
Primitive shapes such as a cube or a cylinder usually come with default UVs. Once the mesh is edited, sculpted or imported from CAD, those UVs are stretched or missing, and the model needs a proper unwrap.
UV mapping and UV unwrapping
UV mapping is the whole job of giving a model 2D texture coordinates. UV unwrapping is one method of doing it: cut the mesh at seams and lay the pieces flat, the way a cardboard box is cut open and folded out. People often use the two terms for the same thing.
The other way to create UVs is projection: the software projects the surface onto the UV space from a simple shape. These projection types speed up the first pass:
- Spherical: wraps a texture around a round object, working outward from the center
- Cylindrical: wraps a texture around an object that fits inside a tube shape, like a can or a limb
- Planar: projects a texture straight through a flat or simple object from one direction
- Box: projects from 6 sides, which suits walls, floors and blocky objects
Texture mapping is a later step. It uses the UV coordinates to place color, roughness and normal images on the surface, as covered in our guide to texture mapping.
Projection works on simple shapes. Once a model has real detail, it needs manual seams and hand adjustment before the result is usable, especially for 3D character modeling.
How to UV unwrap a model step by step
To UV unwrap a model, finish the mesh, mark seams, unwrap, check the result with a test texture, then scale and pack the islands. A UV island is one flattened piece of the mesh. The 9 steps below work in Blender, 3ds Max and Maya.
- Finish the mesh first. Fix stray n-gons, non-manifold edges and loose vertices, and apply the object’s scale. Blender’s manual recommends unwrapping when only minor geometry changes remain, because faces added later need extra UV work.
- Plan the texel density and texture size. Decide how sharp the texture must be and what size it will be, so every later step has a target.
- Mark seams. Cut along hard edges, panel lines and sides that the camera does not see. In Blender, select the edges, press Ctrl-E and choose Mark Seam.
- Unwrap. In Blender, use UV, Unwrap, then Angle Based or Conformal. In 3ds Max, use the Unwrap UVW modifier. In Maya, use the UV Toolkit and Unfold.
- Apply a checker texture. Look for stretched or squashed squares. Blender can generate a test grid image in the UV Editor.
- Straighten islands that carry direction. Wood grain, brick, brushed metal and text must run the right way. Relax islands that are distorted.
- Scale every island to the same texel density. This keeps all parts equally sharp. In Blender, use UV, Average Island Scale in the UV Editor.
- Pack the islands with padding inside the 0 to 1 space, or across UDIM tiles. In Blender, use Pack Islands and set the margin.
- Add a second UV set if the model needs baked lighting, then export and do a test bake. A bake that comes out clean confirms the layout.
Unwrapping in several steps often works better than one command on the whole mesh. Blender’s manual shows a head, an ear and a neck unwrapped separately, each with the projection that suits it, then packed together.
Where to place UV seams
A seam marks where the mesh is cut apart during unwrapping. Every seam becomes an edge in the flattened UV layout, and every edge is a place where a texture can look slightly off if it does not line up on both sides.
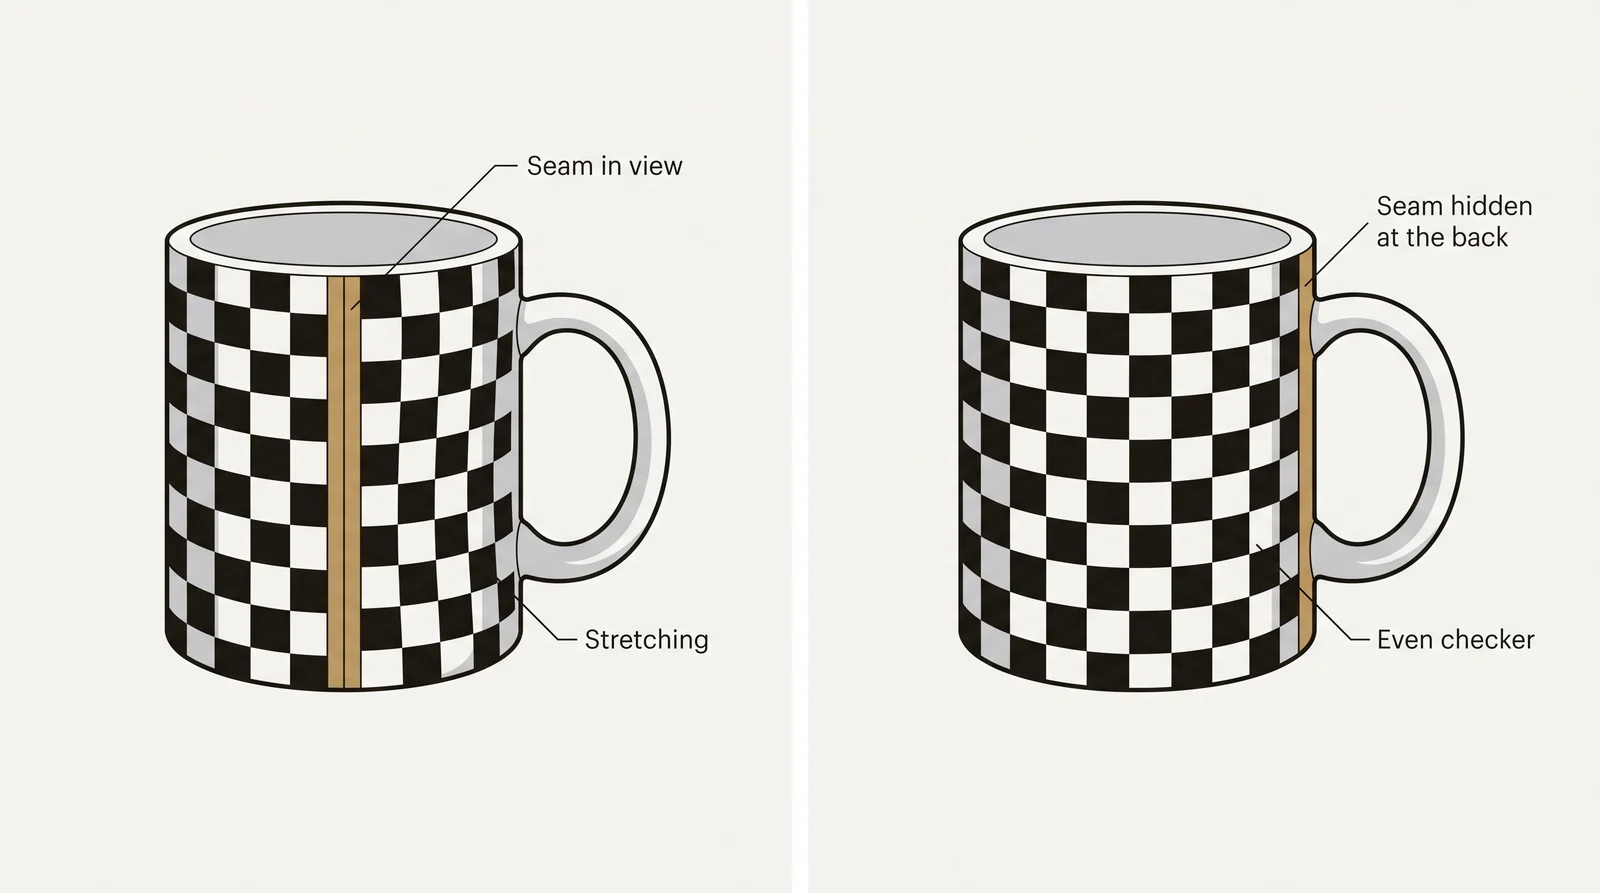
Cutting more seams keeps each flattened piece flatter and less distorted, but it adds more edges to hide. Cutting fewer seams keeps the layout simpler, but the pieces stretch more where they have to bend to lie flat.
A few practical ways to keep seams from standing out:
- Place seams along hard edges or existing panel lines, where a break already reads as intentional
- Hide seams on the underside or back of the model, away from the main camera angle
- Follow a seam pattern the object already implies, such as along a seat cushion’s stitching line
- Paint over a visible seam in a 3D painting tool such as Blender Texture Paint, which paints across both sides of the seam at once
Hard-surface models are usually cut at panel lines. Organic models are cut in hidden areas such as under the arms or behind the ears.
Seams and normal map baking
If the model will get a baked normal map, split the UV islands at every hard edge. A hard edge that sits inside one island shows up in the bake as a visible line or gradient. The reverse is not required: a seam does not need a hard edge. Our free normal map generator is one way to create a normal map from an image.
UV islands, mirroring and UV channels
Once a mesh is cut along its seams, each separate flattened piece is called a UV island. A simple object might unwrap to one or two islands, while a detailed character or product can have dozens.
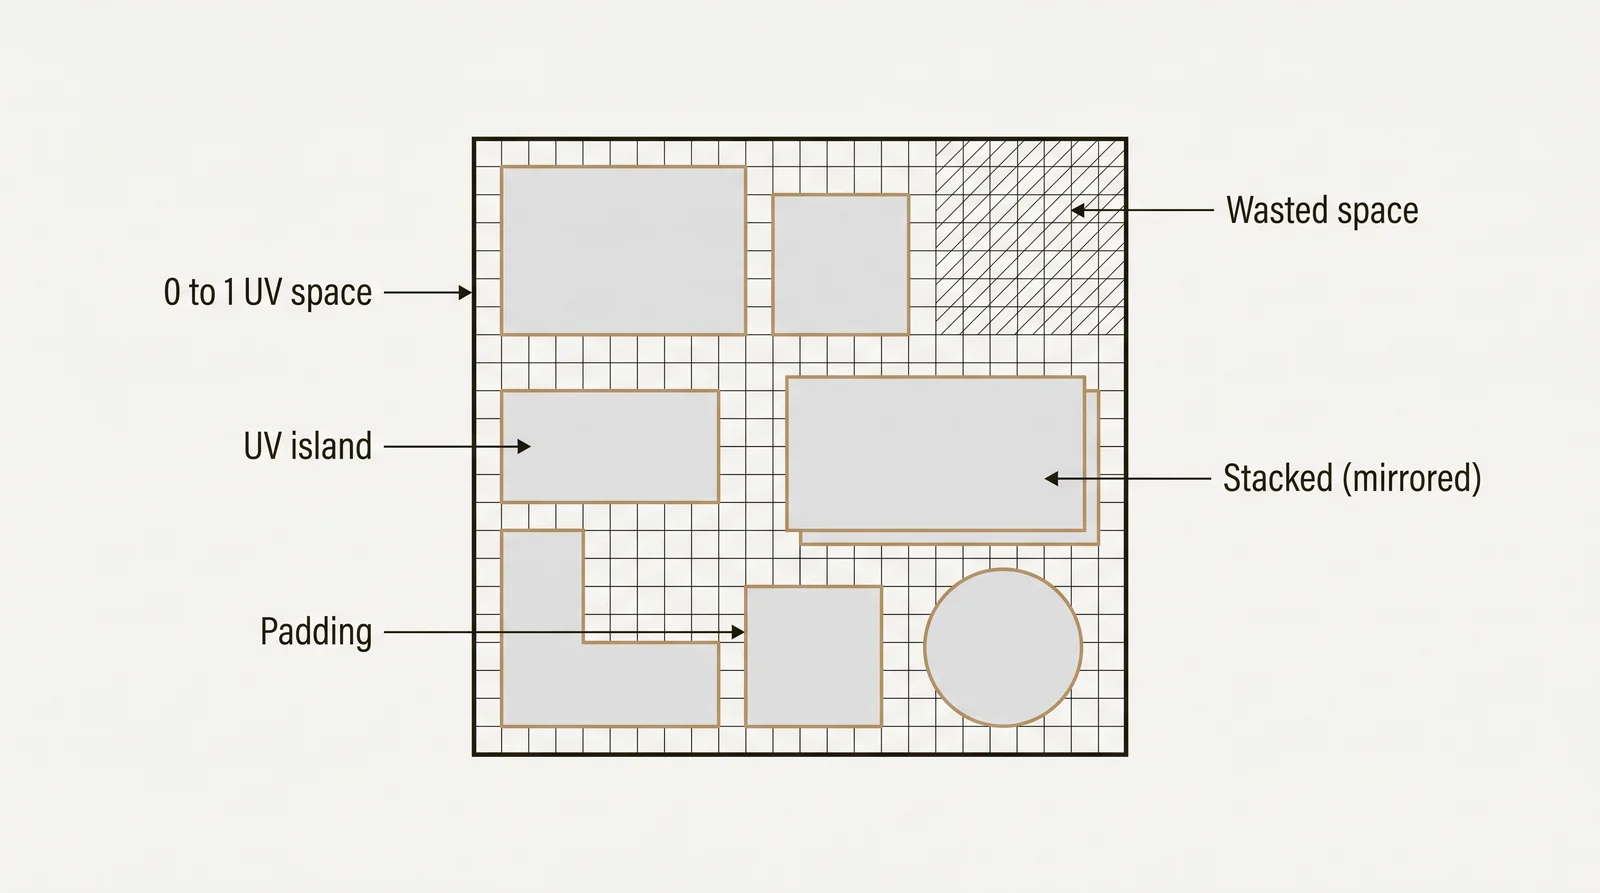
Islands should not overlap in the UV layout, because overlapping islands share the same patch of texture. If two islands sit on top of each other, a scratch or a logo painted on one part also appears on the other.
Overlap is sometimes used on purpose, to repeat one small texture across several parts that all need to look alike, such as identical bricks or slats. This keeps the texture small and easy for a game engine to load, but you cannot add unique detail to just one of those parts later.
Mirrored and stacked islands
On a symmetric model, one half can be unwrapped and the other half stacked on top of it, so both share the same texture area. Before baking normal or ambient occlusion maps, move the stacked islands exactly 1 full UV tile away. Otherwise both halves bake into the same pixels and the bake breaks.
UV channels
One model can have several UV maps, also called UV channels or UV sets. Channel 1 usually holds the texture layout, where overlap is allowed. Channel 2 holds a layout for baked lighting, where every face needs its own unique space with no overlap. Unreal Engine and Unity use a second channel like this for baked lightmaps. Level of detail models are lower detail copies of the same object, and they can often reuse the UV layout of the highest detail version.
Texel density and how to keep it even
Texel density is how many texture pixels cover a given amount of a model’s surface. Equal texel density means every part of the model looks equally sharp.
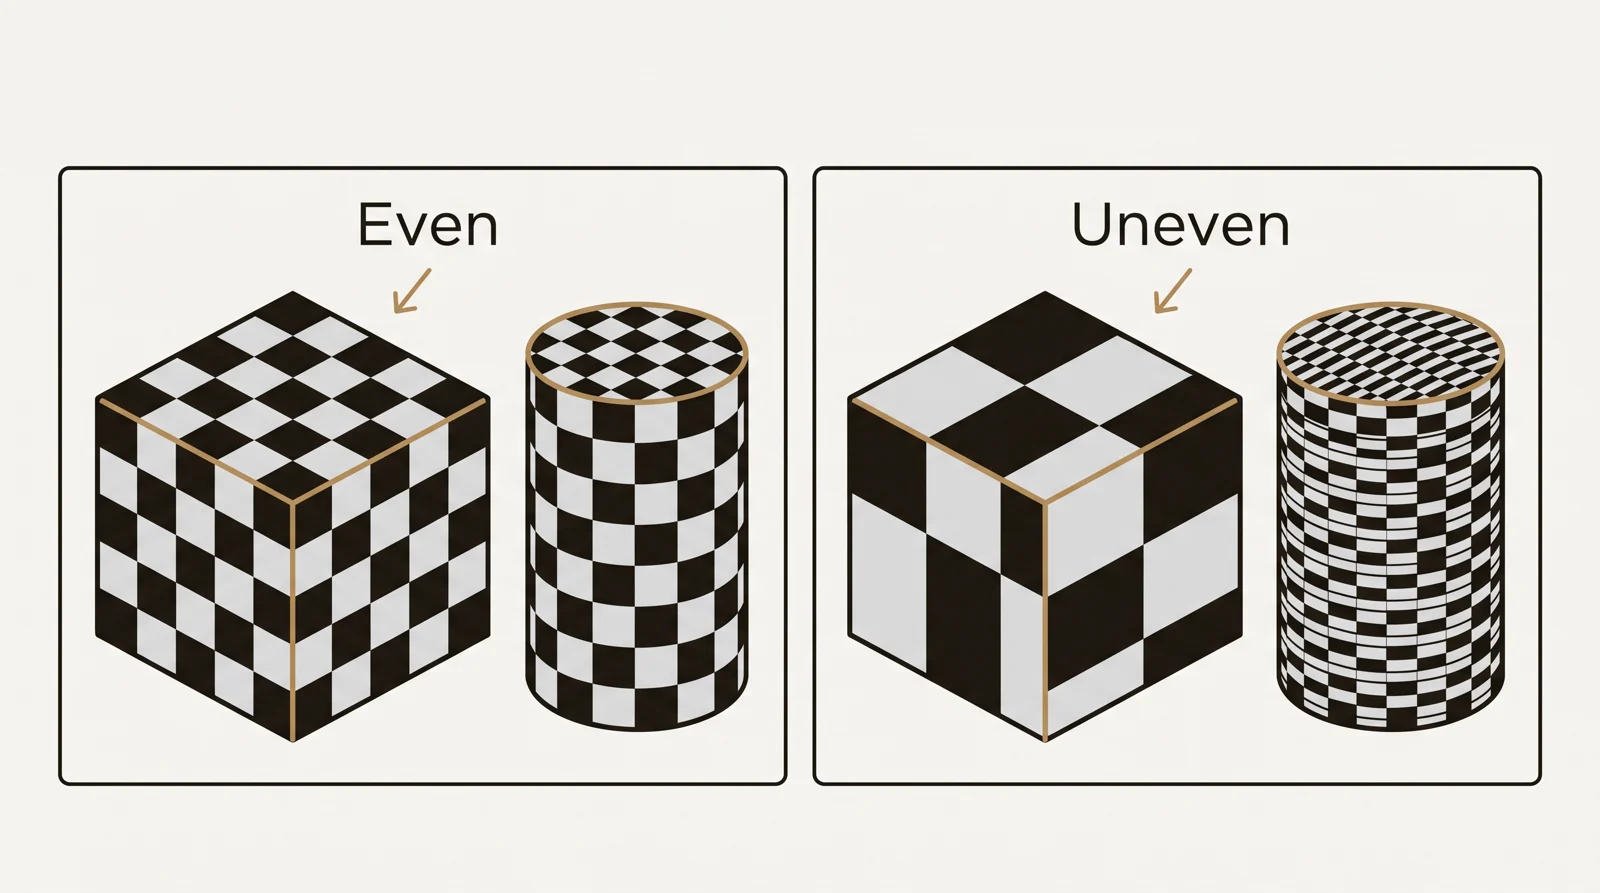
Texel density is set by the size of each island, not by packing. Scale every island in proportion to the surface it covers in 3D, then pack the islands to fill as much of the 0 to 1 UV space as possible without touching. Packing only decides how little of the texture is wasted. Texel density matters most on models built for real time use, where low poly and high poly modeling choices and texture budgets are decided together.
Texel density worked example
A wall that is 2 m wide and fills a texture that is 2048 pixels wide has 1024 pixels per meter. That is 10.24 pixels on each centimeter of wall. A chair that is 1 m wide and fills the same texture gets 2048 pixels per meter, twice the density of the wall. If both objects must look equally sharp, scale the chair’s islands down to half size, or give the wall a larger texture. Game teams often set one target density for a project and scale every island to it.
Tip: compare texel density between parts of the same model by checking the same test texture at the same zoom level. A part that looks noticeably softer usually has a smaller UV island than it needs.
UDIMs and UDIM tile numbers
A UDIM is a numbered UV tile, starting at 1001, that lets one model use several full size textures. A single UV space runs from 0 to 1, and one tile is not always enough resolution for a detailed model.
The numbering follows a fixed rule. The first tile is 1001, and the tiles to its right are 1002, 1003 and so on up to 1010. The row above starts at 1011, directly above 1001. The tile number is 1001 plus the tile’s U position plus 10 times its V position, counting tiles from 0. Texture files carry the tile number in the file name, for example basecolor.1001.png.
Each UV island sits in whichever tile suits it. A character’s head might use one tile at full resolution, while smaller parts like hands or accessories share another.
UDIMs are common in film, VFX and high detail character and product work. Blender supports UDIM tiles, and Unreal Engine imports UDIM named textures as a virtual texture. Real time game assets often keep a single 0 to 1 texture set per material instead.
How to check a UV unwrap
To check a UV unwrap, apply a checker texture and go through the 8 checks below. The same list works as an acceptance checklist when you receive an unwrapped model from a freelancer or studio.
- Even checker squares. The squares should be square and the same size everywhere. Stretched squares mean distortion, and different sizes mean uneven texel density.
- No unintended overlap. In Blender, use Select, Select All by Trait, Overlap in the UV Editor to select overlapping faces.
- No flipped islands. A checker with numbers, or a text texture, shows mirrored lettering on a flipped island.
- Seams on hard edges or hidden sides. Look at the model from the main camera angle and make sure no seam crosses a visible flat surface.
- Enough padding. The gaps between islands must be large enough for the texture size, so color does not bleed across when the texture is reduced in size.
- Straight islands where direction matters. Wood grain, brushed metal, fabric weave and text must run the same way on every part.
- Little empty UV space. Large unused areas mean wasted resolution.
- Mirrored or stacked islands offset before baking. Move them 1 full UV tile away before a normal or ambient occlusion bake.
Automatic and AI UV unwrapping
Automatic UV unwrapping is good enough for lightmap UVs, background props and objects with tiling or procedural materials. It is not good enough for hero products, characters, or anything with a label, logo, text or directional grain.
The common automatic options are:
- Blender: Smart UV Project, which cuts along sharp edges and projects each group of faces, and Lightmap Pack, which places every face separately for baked lighting
- 3ds Max: Flatten Mapping in the Unwrap UVW modifier
- Maya: Automatic mapping followed by Unfold
- Houdini: an Auto UV node in its Labs tools
- Online AI tools that take a GLB, FBX or OBJ file and return an unfolded model
| Object | Automatic unwrap |
|---|---|
| Lightmap UV set | Good enough, since lightmaps need unique space more than clean islands |
| Background prop or distant object | Good enough |
| Object with a tiling or procedural material | Often not needed, box or triplanar projection can replace the unwrap |
| Hero product, character or any object with a label, logo or text | Not good enough, automatic seams land in visible places and cut islands into many small pieces |
| Anything that will be hand painted | Not good enough |
Whatever tool made the unwrap, run the checklist above before you use it.
UV unwrapping software compared
For most single models, Blender’s built in UV Editor is free and enough. Dedicated tools such as RizomUV and UVLayout are faster when you unwrap many assets or complex characters.
| Tool | Type | How it unwraps | Cost |
|---|---|---|---|
| Blender | Built in UV editor, documented in Blender’s own UV editor manual | Unwrap Angle Based, Conformal and Minimum Stretch, Smart UV Project, Lightmap Pack, Pack Islands, UDIM tiles | Free |
| Houdini | Built in UV nodes, plus Auto UV in the Labs tools | Procedural seams, flattening and layout that rerun when the model changes | Paid, with a free non-commercial edition |
| 3ds Max | Built in, as the Unwrap UVW modifier | Manual seams and unfolding, plus Flatten Mapping | Paid |
| Maya | Built in, in the UV Toolkit | Manual seams and Unfold, plus Automatic mapping | Paid |
| RizomUV | Dedicated unwrapping tool for Windows, macOS and Linux, sold as Virtual Spaces and Real Space editions | Automatic seam placement, distortion control, GPU packing | Paid |
| UVLayout | Standalone unwrapping tool from Headus | Interactive flattening aimed at low distortion UVs | Paid, with a trial |
| Ultimate Unwrap 3D | Standalone unwrapping tool for Windows | Planar, box, cylindrical and spherical projections; the Pro version adds seaming, straightening and packing | Paid, with a demo |
| 3DCoat | Painting and sculpting program with a UV workspace | Seams, unwrapping and packing next to 3D texture painting | Paid |
| ZBrush | Sculpting program with the UV Master plugin | Automatic unwrap of sculpted and organic models | Paid |
| SketchUp | No built in unwrapping | Texture positioning on faces only, real unwrapping needs an extension or another program | Not applicable |
A dedicated tool is worth learning when unwrapping takes up a large part of your time, for example on characters or many game assets. If you already work in 3ds Max or Maya, use their built in tools first. If you are starting out, use Blender: it costs nothing, and our Blender 3D modeling tutorial covers the basics.
Exporting a UV mapped model
OBJ stores UVs as texture coordinates, and FBX, glTF and GLB keep them as well. STL stores only triangle geometry, so a textured model loses its UVs and textures when it is converted to STL. The texture images are separate files, so they must travel with the model. For format changes, use our free OBJ converter or FBX converter, and check the result afterward.
Getting a 3D model unwrapped by a studio
Send the studio a clear specification so the unwrapped model fits your pipeline.
What to specify:
- Target engine or renderer
- Texture resolution and the target texel density
- Whether the layout is 0 to 1 or UDIM
- Whether overlap or mirroring is allowed
- How many UV channels: textures only, or textures plus a lightmap channel
- Padding between islands
- File format
What to ask for back:
- The model with its UVs
- An image export of the UV layout
- Checker texture screenshots from 2 angles
If the studio unwraps your own model, send the finished mesh with clean topology. In both cases, send reference images for how the final texture should look.
3Dstudio.co’s 3D modeling service covers this stage for game studios and for standalone product rendering work, building and unwrapping a model to order. Open-ended 3D modeling work is billed at €85 per hour. We reply with a quote within 30 minutes of receiving the files.
Questions about UV unwrapping
What does UV stand for in 3D modeling?
U and V are the horizontal and vertical axes of a flattened 2D texture. X, Y and Z already describe position in 3D space, so the texture coordinates use U and V instead.
Do all 3D models need UV unwrapping?
No. Models with image textures or baked maps (normal, ambient occlusion, lightmaps) need UVs. Tiling materials on simple shapes such as walls and floors can use box or triplanar projection instead of a full unwrap, and a plain color needs no UVs at all.
Is UV unwrapping difficult to learn?
Simple objects such as a box or a table take minutes once you know seams and the checker test. Characters and hard-surface products with many parts take practice, because seam placement and packing are judgment calls. The hard part is planning seams and texel density, not pressing the unwrap button.
Why can’t I see my UV unwrap in Blender?
The UV Editor shows only the faces you select in Edit Mode unless Sync Selection is on. Other common causes: the mesh has no UV map yet (check the UV Maps panel), a different UV map is active, the viewport is in Solid mode so no texture shows (switch to Material Preview), or no image texture is connected to the material.
How do you UV unwrap a model automatically?
In Blender, select all faces and use UV, Unwrap, Smart UV Project. In 3ds Max, use Flatten Mapping in the Unwrap UVW modifier. In Maya, use Automatic mapping, then Unfold and Layout. This is fine for lightmaps and background props. Hero objects need manual seams.
What does UVW mean in 3ds Max?
3ds Max calls texture coordinates UVW. U and V are the 2 axes of the image, and W is a third axis used by some projections and 3D procedural maps. For normal 2D image textures, W can be ignored.
Does an STL file keep UV maps and textures?
No. STL stores only triangle geometry. To keep UVs, use OBJ with its MTL and texture files, FBX or GLB.